
![]() 859-553-9033
859-553-9033
![]() 859-553-9033
859-553-9033
While paw alerts ensure that you are aware of your dog’s presence, sometimes they can be a little ambiguous. Dogs that are naturally paw oriented will learn the paw alert in scent training sessions very quickly, however those same dogs will also tend to use their paw for other communication because it is natural for them. For example when she wants affection she may place her paw on your arm, or when she needs outside she may attempt to place her paw on your lap. This can cause confusion, unnecessary glucose testing, and lead to frustration because she either appears to be false alerting or appears to be missing alerts.

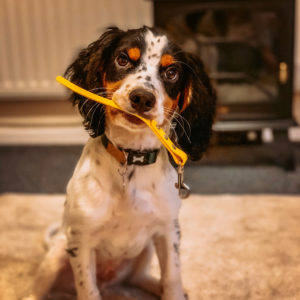
All DAD training requires reading your dog’s body language and signs, but one way to make it a little easier is to add in a secondary alert that is a very unnatural behavior for your dog, such as a bringsel hold. In DAD training, a bringsel is a tab that the dog holds when they are alerting to your low or high glucose levels.
Bringsel training is not for the faint of heart, and often requires frequent troubleshooting. Not every dog needs to be, or even should be, taught a bringsel alert. Paw alerts and nudge alerts are frequently just as effective and are easier to teach because they do not require an additional variable which complicates scent training. If you are new to training or not confident in problem solving, focus on paw or nudge alerts alone, or consult a trainer during bringsel training to ensure your dog’s existing alerting abilities are not compromised. However, if you are committed to training a bringsel alert, below are MD Dogs’ step by step instructions broken down to ensure that your dog has a firm understanding of the bringsel hold as well as when it is to be used.
There are two types of bringsels. One type are velcro retrieval bringsels – typically a stuffed canvas tube which has velcro on the end and hangs on the handler’s belt loops as well as in certain locations around the house. The dog pulls the bringsel and brings it to the handler.
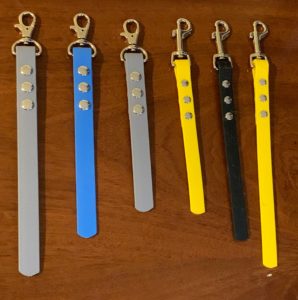
The second type of bringsel is one that hangs on the dog’s collar at all times and the dog picks it up in their mouth to alert. MD Dogs designed a bringsel of this type, specifically to easily clip on and off the dog’s collar and made of biothane so they can be easily cleaned by wiping them down to prevent dirt and bacteria from accumulating. The benefit to MD Dogs bringsels is that the bringsel is always available to the dog in the same location and does not rely on the handler’s wardrobe including belt loops, or on bringsels being hung around the room. However if you prefer the velcro retrieval bringsels, then the instructions below can be modified accordingly.
 The width of a bringsel typically has little effect on the ease of use. There are two widths for an MD Dogs bringsel – ⅝ inch and ½ inch. The ⅝ inch bringsel may be a little easier for the dog to hold, but will be slightly cumbersome on a small breed, while the ½ inch tends to curve a little if it is long for a large dog. But both are effective!
The length of a bringsel is much more important than the width. Too short of a bringsel will be difficult for the dog to grab, causing them to possibly give up on using it, however too long of a bringsel risks the dog will step on it throughout the day. To determine the right length, measure from where your dog’s collar sits to the top of your dog’s breastbone (this protrudes from the rest of their chest). Multiply this measurement by two, and this is the length of the MD Dogs bringsel to order! Example: Beni’s collar-to-breastbone measurement is 3”, so the 6” bringsel is perfect for him. (This is only applicable for MD Dogs branded bringsels by CSJcreations, not those sold by any other store due to sizing differentiations.)
Introduce the bringsel after your dog has reached Step 9 and is successfully alerting to hidden scent samples. This is because if you begin bringsel training too early on, then there will be more value for the bringsel than the scent of low blood sugar, so the dog will hold the bringsel, appearing to false alert, but not because they are confused about the scent of low blood sugar but because they are hoping to receive a puppy party.
Unlike in the Scent Training steps, if your dog independently moves on to the next step before all the repetitions are completed, that is completely okay! Mark and reward it! For example, if you are on Step 1 when she attempts to put the bringsel in her mouth, mark and reward it immediately because that’s what we’d like her to do. Then repeat it again and if she puts it in her mouth again, mark and reward and continue with Step 2. If she only investigates, then that’s okay too; just continue with Step 1 until she offers the behavior of putting it in her mouth again.
Step 1: Bringsel investigation. While at your dog’s level (kneeling, sitting on the ground, or sitting in a chair) hold the bringsel in your hand and present it in front of the dog. When she investigates it mark and reward. Repeat approximately 20 times.
Step 2: Bringsel in mouth. Hold the bringsel in your hand and present it in front of the dog. When she makes contact with her mouth mark and reward. Repeat approximately 40 times.
Step 3: Bringsel investigation on ground. Place the bringsel on the ground in front of the dog. When she investigates it, mark and reward. Then begin to reward only when she goes to pick it up. Repeat approximately 15 times.
Step 4: Bringsel pick up. Place the bringsel on the ground in front of the dog. When she picks it up all the way, mark and reward. Repeat approximately 30 times.
Step 5: Bringsel hold short duration. Place the bringsel on the ground in front of the dog. When she picks it up all the way, wait 1 second and then mark and reward. Gradually increase the time she must hold it before you mark and reward, until you reach 3 seconds.
Because we teach the dogs through shaping where they learn to offer a different behavior if they are not rewarded quickly, provide feedback to your dog as they are holding the bringsel so that they understand they are doing well and should continue holding it. I count out loud as my communication to continue holding. For example toward the end of this step my verbal communication to the dog sounds like this:
“1 mississippi, 2 mississippi, 3 mississippi. Yes! Good job, Fido!” and when I say “Yes!” I am also presenting a food reward.
If she drops it at any point, just give her a negative marker word in a neutral tone and wait for her to try again. (do *not* sound negative in the slightest – a negative marker word is purely to communicate that she doesn’t get a reward for that and should try again). If she drops it a few times in a row, return to the previous step or end the session and try again later. Repeat as many times as needed until she picks it up and holds it for 3 seconds routinely.
Step 6: Adding the verbal cue. After practicing Step 5 a few times immediately before, place the bringsel on the ground again and at the same time give your verbal cue you’d like to use so she pairs the verbal cue with the behavior of holding the bringsel for 3 seconds. Example cues: “Bringsel”, “Hold”, “Alert”. Repeat approximately 5 times.
 Step 7: Bringsel hold long duration. Repeat Step 5, but working from a 3 second hold up to a 10 second hold and incorporating her verbal cue each time she is about to pick up the bringsel. Repeat as many times as needed until she picks it up and holds it for 10 seconds routinely.
Step 8: Generalize the bringsel hold. Instead of being at your dog’s level, stand up and drop the bringsel on the ground and give her bringsel verbal cue. When she picks it up mark and reward. Repeat approximately 5 times.
Step 9: Generalize the bringsel hold long duration. Repeat Step 8, but work up to the dog holding the bringsel for 10 seconds routinely, gradually increase the duration to set her up for success. Again use any verbal communication needed to encourage her to continue holding it, and over time you can fade the verbal communication out. Repeat as many times as needed until she picks up the bringsel and holds it for 10 seconds.
Step 10: Bringsel hold with handler movement. While standing, place the bringsel on the ground and give the dog the verbal cue to hold it. Then take a few steps while giving verbal communication for the dog to continue holding it. After just a few steps and about 3 seconds, mark and reward! Gradually increase the duration and the steps you take, teaching the dog to continue holding the bringsel no matter where you are or what you are doing. Work up to the dog holding the bringsel while you walk for 10 seconds in any direction or movement pattern. Repeat as many times as needed.
Step 11: Vertical bringsel hold. While at your dog’s level again (kneeling, sitting, or on a chair), hold the bringsel from the clip end, so it is dangling vertically in front of the dog. Give the “bringsel” cue and when she puts it in her mouth, mark and reward. Repeat approximately 5 times.
Step 12: Bringsel hold from collar attempt. In the same training session as practicing Step 11, clip the bringsel to the dog’s collar. Give the “bringsel” cue and when she attempts to hold it, mark and reward. Repeat approximately 3 times.
Step 13: Bringsel hold from collar success. Repeat Step 12, but wait until she successfully holds it in her mouth. When she does successfully hold it, mark and reward with praise! Repeat approximately 10 times.
Step 14: Bringsel hold from collar duration. Repeat Step 13, but gradually increase the duration of the bringsel hold, utilizing the same verbal communication you used in Step 5. Repeat until she routinely holds the bringsel hanging on her collar for up to 10 seconds.
Step 15: Preparing to pair the scent and bringsel. Thaw a low blood sugar scent sample and place it in a tin, and clip the bringsel to the dog’s collar. While at your dog’s level, present the tin to the dog. Mark and reward her for sniffing the tin (if she gives the previously taught indication such as nudging, pawing, etc. that’s completely okay as well). Repeat only 3 times.
Step 16: Pairing the scent and bringsel. With two rewards in your hand and directly after Step 15, present the tin again in front of the dog. Give the first reward when she sniffs tin, and then immediately give the “bringsel” cue. When she holds the bringsel, mark and reward with the second treat. Repeat approximately 20 times.
*If she gets frustrated and repeatedly sniffs or indicates on the scent tin rather than holding the bringsel, reward intermittently to avoid accidentally untraining her response to low blood sugar. Just also continue asking for the bringsel hold as well.
*If she begins to hold the bringsel without sniffing the tin, withhold the reward until she goes to acknowledge the tin again
Step 17: Generalize the sniff and hold. Repeat Step 16 but hold the sample tin at different locations – to the left of your body, to the right of your body, behind your back, etc. This teaches the dog to find the scent source, sniff it, and hold the bringsel. At this stage also begin to fade out the bringsel cue, waiting for her to offer it on her own. Repeat approximately 20 times.
Step 18: Incorporating the bringsel hold to hidden scent samples. Repeat Step 9 of scent training (hiding a scent sample on your body). When the dog locates the scent sample, mark and reward. Then wait for her to hold the bringsel, and mark and reward again. Repeat regularly throughout your dog’s working life.
Tips: